Tutorial Postal Reciclado / Recycled Postcard Tutorial & 2º Desafio - 7º Projecto / 2nd Challenge - 7th Project
Peço desculpa pela qualidade das fotos não ser a melhor, mas foi feito à noite.
-<>-
Recently I participated in a swap in which we had to send a handmade postcard along with the rest of the content, so I remembered to do a recycled postcard and photograph the process, to finally present you my first tutorial.
I apologize for the poor quality of the photos, but it was done at night.
Para fazer este postal é necessário:
- Cartão na dimensão que desejarem que o vosso postal seja (pode ser uma capa de caderno, uma embalagem de cereais...)
- Dois tipos de papel de embrulho
- Cola para papel
- Uma folha pautada para escreverem a vossa mensagem
- Decotape
- Pré-cortados para enfeitar
-<>-
To do this postcard you need:
- Card in the size you want your postcard to be (you can use an old notebook cover, a cereal box...)
- Two types of wrapping paper
- Paper glue
- A sheet to write your message
- Decotape
- Pre-cut shapes for embellishment
Começamos então com o nosso cartão.
Eu usei uma capa de caderno velha.
-<>-
Let's start with our card.
I used an old notebook cover.
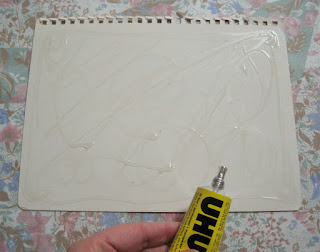
Num dos lados do cartão, espalhamos uma boa camada de cola (eu usei UHU).
-<>-
In one of the sides of the card, we spread a nice layer of glue (I used UHU).
Agarramos no papel de embrulho que escolhemos para o lado exterior do postal, colocamos a parte de trás virada para cima e colamos o cartão ao papel.
-<>-
We grab the wrapping paper we chose for the outside of your postcard, with the back facing us, and glue our card to the paper.
Cortamos agora o excesso de papel de embrulho, bem como irregularidades no nosso cartão.
-<>-
Now we cut the excess of wrapping paper, as well as irregularities in our card.
Voilá!
Dobramos agora o nosso cartão ao meio.
-<>-
Now we fold our card in half.
Colocamos uma generosa camada de cola nesta face.
-<>-
We put a generous layer of glue on this side.
Agarramos no 2º papel de embrulho, dobramo-lo onde queremos que coincida com a dobra do cartão e colamos.
-<>-
We grab the 2nd wrapping paper, fold it where we want to coincide with the bending of the card and stick it.
Cortamos o excesso de papel.
-<>-
We cut the excess of paper.
Já temos o nosso cartão, agora só temos de o enfeitar ao nosso gosto!
-<>-
We already have our card, now all we have to do is decorate as we want!
Para o meu cartão, usei decotape nas laterais do cartão, para reforçar a colagem dos papeis de embrulho, e também para enfeitar.
-<>-
For my card, I used decotape in the sides of the card, to enhance the bonding of the wrapping paper, and also to decorate.
Na parte de trás colei umas borboletas pré-cortadas de papel, não só para decorar mas também para esconder algumas imperfeições do papel de embrulho.
Nunca deitem fora os papeis de embrulho, porque podem sempre desfarçar as imperfeições deixadas pela fita-cola arrancada ou uma parte mais amachucada com uma decoração bonita!
-<>-
On the back I glued some pre-cut paper butterflies, not only for decorating but also to hide some imperfections of the wrapping paper.
Never throw away wrapping paper, because you can always disguise the imperfections left by adhesive tape or a creased part with a beautiful decoration!
Para a parte da frente usei umas flores pre-cortadas de jornal pintado, outra forma de reciclar!
-<>-
For the front I used some pre-cut newspaper flowers, another way to recycle!
No interior, colamos uma folha para escrever a nossa mensagem.
-<>-
On the inside, we glue a sheet to write our message.
Prontinho!
Espero que tenham gostado e se experimentarem deixem-me um link nos comentários para ir ver!!
-<>-
All done!
I hope you like it and if you try it please leave a link in the comments so I can check it out!!
 |
| Submitted here |
 |
| Submitted here |
 |
| Submitted here |


2 lovely comments:
É meu :D
This is a darling project!
Thank you ever so much for linking up.
I do hope you have a glorious weekend.
Enviar um comentário